Printmaking
- sadiemcarfagno
- Dec 13, 2025
- 5 min read

Types of Printmaking:
Stamping
Collagraph (Creation of raised textured surface of found objects)
Relief Printing (Styrofoam, rubber, linocut)
Reduction Print (Multi color through successive cutting)
Monotype
Stenciling
Stamping:

Stamping Materials:
Found Objects
Construction Paper or Other Paper
Paint (Blick block printing paint was used, make sure the paint is opaque)
Lorzon Craft Ink Pad
Paper Plates
Paper Drop Cloth or Newspaper (as table cover)
Find objects of all textures and shapes (and objects you can throw away afterwards)
Squeeze paint onto a paper plate or wide flat surface
Dip objects in paint and stamp onto paper
The Lorzon brand craft ink pad can be used as an option depending on the type of found objects being used:


Collagraph:

Collagraph Materials:
Thick Board
Found Materials
Paint (Blick block printing paint was used, make sure the paint is opaque)
Paintbrush (or tool to scoop paint out of the container)
Brayer
Tin Foil
Paper Drop Cloth or Newspaper (as table cover)
Hot Glue and Gluegun
First you find found materials and hot glue them securely to a board (hot glue works best). *see safety information on hot glue guns in previous collage blog*
Roll out a glob of paint evenly onto a flat surface with the brayer to evenly coat the brayer (until it becomes thin enough to make a crackly sound and make it look as if the paint's been sponged)
Paint over the objects and board with a brush or brayer
Paint can be dolloped on a sheet of foil and rolled out evenly onto the brayer before being applied to the board of found objects
Press the board face down on a sheet of paper and pull away to create a print

Relief Printing (Styrofoam, rubber, linocut)
Styrofoam:

Materials:
Styrofoam Sheets
Paint (Blick block printing paint was used, make sure the paint is opaque)
Paintbrush (or tool to scoop paint out of the container)
Brayer
Barren
Speedball AKUA Clear Printing Plate or Tin Foil to roll out paint with
Paper Drop Cloth or Newspaper (as table cover)
Carve into the styrofoam with a pencil
Roll out a glob of paint evenly onto a flat surface with the brayer to evenly coat the brayer (until it becomes thin enough to make a crackly sound and make it look as if the paint's been sponged)
Roll over the image with a brayer
Turn the styrofoam over and press it onto a piece of paper, pressing down with a barren
Lift to see the transferred image
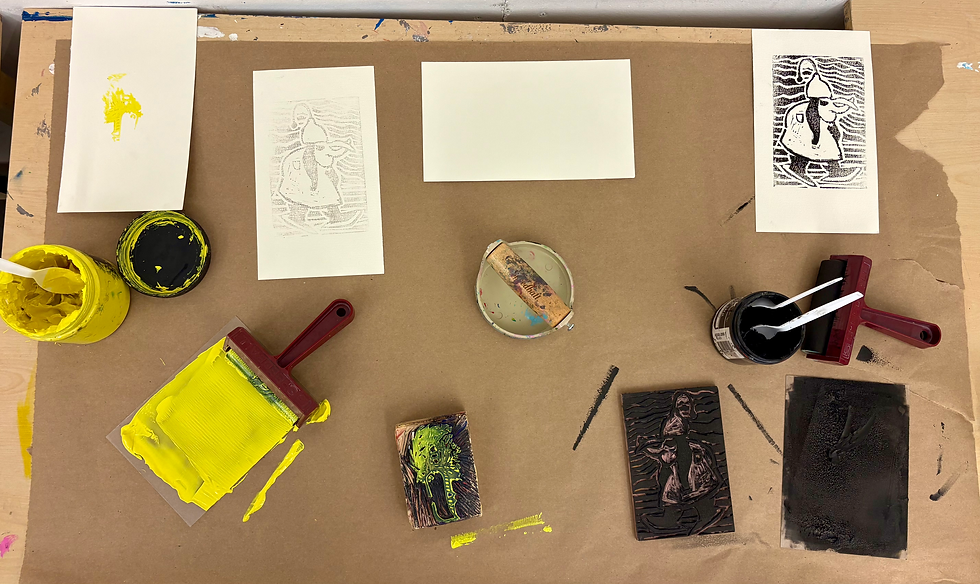
Linocut or Rubber or Wood:

Materials:
Speedball Linocut Block or Wood Block
Speedball AKUA Clear Printing Plate or Tin Foil to roll out paint with
Paint (Blick block printing paint was used, make sure the paint is opaque)
Brayer
Barren
For Linocut:Speedball Lino-Cutter and Gouge Tips
For Wood: Jack Richeson Wood Carving Knives
Paper Drop Cloth or Newspaper (as table cover)

Carve into the linocut block with the Lino-Cutter and Gouge Tips
(or the wood block with the carving knives)
Roll out a glob of paint evenly onto a flat surface with the brayer to evenly coat the brayer (until it becomes thin enough to make a crackly sound and make it look as if the paint's been sponged)
Roll over the image with a brayer
Turn the styrofoam over and press it onto a piece of paper, pressing down with a barren
Lift to see the transferred image

Monotype:
Materials:
Gelli Arts Gel Printing Plate
Found Objects and Stencils
Paint (Blick block printing paint was used, make sure the paint is opaque)
Brayer
Barren
Paintbrush (or tool to scoop paint out of the container)
Paper Drop Cloth or Newspaper (as table cover)

Roll out a glob of paint onto the Gel Printing Plate evenly with the brayer to evenly coat the brayer (until it becomes thin enough to make a crackly sound and make it look as if the paint's been sponged)

Place flat found objects and stencils over top the paint


Place a piece of paper on top and press it into the objects with the barren


Peel the paper away for your print!

Ideas for Application in the Classroom:
Monotype, collagraph, and stamp printing were the best for using found textures
Collagraph and stamp printing would be best used for 4-11 year olds
Monotype printing could be used for all ages but cleanup my be difficult with sticky reusable objects to stamp and with washing the gel plates
Problem with collagraph printing: uses hot glue guns (which there may not be enough of or enough outlets for a class to all use at once and it requires supervision for younger kids
Problem with monotype printing: there may not be enough gel plates for everyone to use at once and it will be messy
Solution: Divide class into 2-3 groups for stations for monotype, collagraph, and stamp printing stations
One idea for a lesson could be to have the students create these prints in a very purposefully abstract way and then another day (once they dry) students can draw on top with POSCA pens or other materials on top. Students could be pushed to use their imagination this way to create images out of the colorful blobs. Or to draw outlines or zentangles on top. Another idea could be to use the print as some kind of abstract background from an imaginative world and to draw what they imagine to live inside of it. Our reading Exploring Studio Materials, Teaching Creative Art Making to Children by Mary Hafeli said it is very common for artists to use many printmaking techniques and hand drawing and painting techniques on top of their printmaking (page 136)
Differentiation Strategies:
Offering more than one type of printmaking method for kids with different skill sets
Offering many types of found objects to grip and stamp
Could spend some time outside to gather leaves or materials of different textures to use to
Help run hyperactive kids and get their energy out before sitting
Create a more personal connection to the lesson and materials used with linking the artwork to an outdoor experience
Differentiation Strategies leading to more Ideas for Application in the Classroom:
Younger Kids: class could listen to 2-3 songs of different emotions to time them finding materials like leaves outdoors
Older Kids: could listen to 2-3 songs of choice on their phone of different emotions to time them finding materials
Then students could be asked to pick a song they heard during their experience gathering materials and to try to convey the emotion or feeling of that song through color and texture in a print (making 2-3 prints for 2-3 songs)
This would make room for their own interpretations and assessment could be their ability to explain the connection between their interpretation and their artistic choices


Comments